Friday night was the first time I drove at night since getting back from Burning Man. As I was driving along, I saw a couple of people crossing the road up ahead. They were wearing fairly dark clothes, and the road wasn’t very well lit. My first thought was a somewhat indignant “Why aren’t those people wearing lights?”, and my second thought was “Wait, what? Hehehe.” And then it happened again with the next set of people, walking along the footpath, and the next. I imagine the effect will wear off, as I get used to people walking in the dark without EL wire or glowsticks or Christmas-tree lights. But right now my brain still classifies it as a bit reckless, a bit silly, and a bit inconsiderate to walk around at night without personal lighting.
Archive for the ‘Burning Man’ Category
A Short Story About Personal Lighting
Posted in Burning Man on September 18, 2011| 2 Comments »
But Sleep Time Comes Before Adventure Time
Posted in Burning Man on August 19, 2011| Leave a Comment »

All packed. Just one (checked) bag, but it's absolutely chockers.
I’m packed and ready to go. My back hurts and I’m exhausted – the last few days have been busy and stressful, trying to get everything done.
I’ve got a bit of sewing still to do en route from Texas to Nevada, but my bags are packed, my boarding passes are printed, and my sewing machines will both be glad to see the back of me (I’m taking them both for a service when I get back, poor things).
Now I’m going to get a few hours sleep before I have to get up at 3:30ish to head to the airport (blergh).
There might be an update or two in the next week, but I’ll be writing lots of notes, like a good ethnographer, so I’ll at least have lots to say when I get back.
Been Too Busy To Blog
Posted in Burning Man, Geeky, Sewing/Craft on August 17, 2011| Leave a Comment »
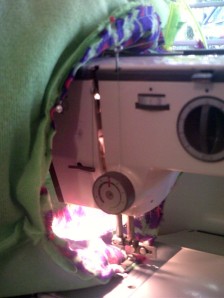
Sewing with EL wire & faux fur

Starting a pile of stuff to pack

Learning to solder EL wire

Three strands of EL wire done, 12 to go

Doing the I-made-a-tutu dance

Sheep hat! (with sheepskin from my old car seat covers)
Shibori Experiments
Posted in Burning Man, Sewing/Craft on August 2, 2011| Leave a Comment »
I’ve had an interest in shibori – traditional Japanese fabric dying – for a while, since I did a workshop at a textile art exhibition a couple of years ago. One of my plans for Burning Man costumes was to dye some voile and make a bunch of light tops for daytime wear.
Yesterday I prepared my pieces of fabric. I cut four pieces of voile in different sizes, and folded and scrunched them in various ways…

Top to bottom: 1. wrapped with string around a plastic tube and scrunched up tight; 2. stitched and gathered; 3. folded with a diagonal concertina fold and tied with string; and 4. folded in a pattern I made up (it might have a name but I don't know it) and then pressed between two bits of wood, with some chunky brush-bristles for texture
The dye I used is fancy stuff called Liquid Radiance – unlike most other dyes you can use it on any sort of fabric, and you can use it as paint too. In some ways it doesn’t work quite like other dyes, so I wasn’t sure how my experiments were going to come out. I was also trying not to use too much of it, so I used the dropper bottles instead of the usual method of dipping the fabric in a container of dye. That let me do some multiple-colour stuff that I couldn’t have done the other way. The voile resisted the dye a bit – I ended up dampening the fabric with a spray bottle to encourage the dye to spread.
Here’s what I got – first the ‘In Progress’ shots, and then the results:

Scrunched around a tube - the result. This technique is supposed to produce patterns that look like waves or ripples - I think you can see that effect here - hooray!

Gathered and salted - in progress. For this one I sprinkled some salt on the piece after applying the dye. The salt dries up the colour, making little spots. I hoped the salt effect would show in the loose parts and not penetrate so much in the tight gathers.

Gathered and salted - the result. Here is the wide view of this one. The lines of gathering didn't have as much effect as I'd hoped. Maybe next time I'll try a shorter stitch or more than one line of stitching at each gathering position.

Gathered and salted - a close up. Here you can see the tiny spots. Next time I'll use the right sort of salts instead of table salt - and in chunkier pieces.
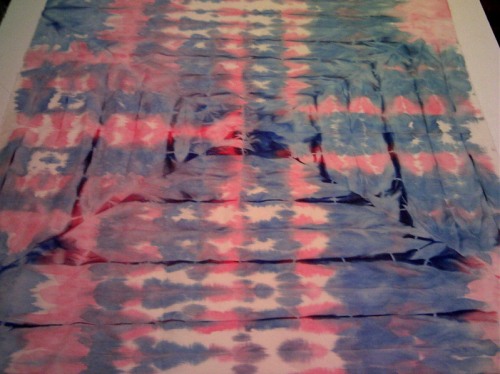
Concertina fold and tied - the result. The folding was actually a bit more complicated - folded in half, and then all the corners folded in like an envelope, and then concertina folded - the envelope bit gives that square effect. The blue ran a lot and ended up kinda overtaking the red.
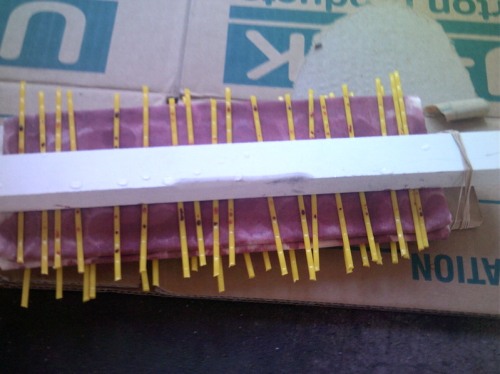
Funny fold with brush bristles - in progress. I started with just brown, but at the end I decided it was a bit boring, so I added some splashes of the last of the purple.

Funny fold with brush bristles - the result. The bristles only really had an effect on the outermost layer, resulting in a cool centre panel thing. I'm going to have to rethink my plans for this piece of fabric - make that panel a feature. This dye seems to travel quite easily along the fabric, even into tight places you don't want it to go - a bit of a complication for mechanical resist techniques.
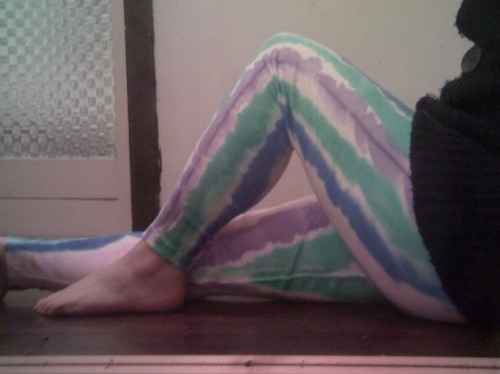
And now, the pièce de résistance… I acquired a pair of white thermal pants – free, but boring 😛 So I made them stripy:
Corset Making 2 – The Mockup
Posted in Burning Man, Sewing/Craft on July 7, 2011| Leave a Comment »
(Following on from Part 1 – making a pattern)
Step 3 – Starting the Mock-up
- Firstly, the reason for making a mock-up instead of jumping straight to the Real Thing is to make sure it will fit properly – far better to be making adjustments to a practice version than to your (often fancy and expensive) final fabric.
- I made a photocopy before I cut out my paper pattern pieces, just in case something happened to them. Then I cut them out, and labelled them – which piece, which way up, and my name (because there are three of us making corsets at the moment)

Paper pieces cut out. I had to weigh them down - they wanted to curl after their trip to the library in a roll.
- The next step, which I forgot to photograph, was to cut out two of each pattern piece from some cheap but relatively sturdy material. I used some plain cotton calico, but twill would have been a bit sturdier. Very important– don’t forget to add seam allowance! Mark the pieces so that you know which are for the right hand side and which are for the left hand side – or some other system to help you figure out which seams go with which other seams – there’re lots, and it’s confusing.

Note the extra seam allowance around the edge of the fabric piece. I usually add seam allowance to my pattern pieces, but for this I wanted to be able to mark the exact seam lines to follow.
- Once you have your pieces it’s time to sew them together – all the left hand pieces, and all the right hand pieces, so you end up with two half-corsets. I hand stitched mine, but the others machine-stitched theirs – whichever you prefer. I thought it would be easier to get the differently curved seams accurately matched by hand… Despite my careful measuring and careful sewing, none of the seams match exactly, but they’re pretty close.

The pattern pieces sewn together. But wait...
- This is where I suddenly noticed that the two pieces are not the same shape. Minor confusion ensued, as I tried to figure out where I’d sewn something wrong (all the seams match ok!). It seems that friday night with friends and Hot Fuzz is not conducive to error-free sewing.

It should have been like this.
- Now there are two correct half-corsets. I know they’re correct because I checked three or four times.
Step 4 – Inserting the Busk
- The busk is the hooks-and-eyes on a strip of boning doo-hickey that is used for the front closure. Having a front closure means you don’t have to unlace and relace the back completely to get in and out of the corset. To get a better idea of the shape it will give to the final corset, I decided to insert the busk in the mockup, instead of just sewing the front seam. This was a slightly tricky procedure, and I’m glad I did it now – some practice before I do the important one.
- In the final corset the busk will go between the outer fabric and the lining. I cut some strips of fabric and sewed them to the two centre-front seams to simulate the lining. I pressed the seam open and then pressed it again folded back into position. I’m a big fan of pressing – it makes the seams look better, and for something like this it also opens the seam right up and keeps it flat, right where it should be. Pressing makes garments look like they were sew by someone with skillz.
- Then I lined up one of the busk pieces and traced around it with a fabric pen. I laid the two front seams together, lined up, with the (hooked together) busk on top, and traced the second busk piece. I also marked where the hooks and the eyes would go.
- On the eyes side, I unpicked bits of the side seam where the eyes would slip through between the two pieces of fabric (Aside: quick-unpickers are like socks for disappearing – I have 4 in my house and couldn’t find any. Until I was finished carefully unpicking with scissors, when I found one in the sewing table). I also did some top-stitching to reinforce the seam – otherwise the loose ends where I unpicked would pull the seam apart under pressure. I’ll do something a bit more careful and elegant for the final corset – this time round it’s just a proof of concept and a practice run.

The "eyes" side of the busk
- On the hook side, I had to make holes in the fabric to poke the buttons through. This is supposed to be done with an awl, pushing between the threads of the fabric, so that there are no broken threads to reduce the structural integrity of the fabric. I don’t have an awl, so I used crochet hooks – starting with the 3mm, then a 5mm, until the hole was big enough to get the button through.

The "hooks" side of the busk
- Here it is with the busk “done up”:

Ta da!
- The last step was to try it on and see how it fit. Despite the gaffer tape in Step 1 being pulled tight enough to really squish me, it is big enough to meet at the back – there should be a gap for the lacing. I’ll be taking off a few centimetres at each side seam to fix that. Other than that it seems to fit pretty well – hooray!

It fits! Hooray!
Corset Making 1 – The Pattern
Posted in Burning Man, Sewing/Craft on June 26, 2011| 2 Comments »
Step 1 – Fun with gaffer tape
- Put on an old t-shirt (no bra) and get a friend to wrap you up in gaffer tape. Err on the side of tightness, because once it’s made, the gap at the lacing will make the real thing looser than the gaffer tape version. Choose lighter-coloured gaffer tape so that you can draw on it with a marker pen. Run out of gaffer tape when have you go over it again to make it tighter, and end up using black instead of silver (so much for that bright idea).
- Mark the centre front and centre back with a marker pen or coloured tape. Mark the edges of the pattern pieces – I’m going to have 8 pieces in total, four at the front and four at the back. This is a good time to also mark out the shape you want the corset to have – before you cut it off. I forgot this bit. 😛
- Cut up the centre front. Use good scissors which will cut at the tip of the blades! Because it’s so tight, if you have to use the back end of the blades, you’ll end up a bit stabbed. Even with good scissors you’ll probably be a bit stabbed. Don’t forget that you’re naked under the t-shirt – you might want to do the cutting in a different room than the one all your friends are in (I nearly forgot this bit :P)
- Cut along the marked lines to get the pattern pieces. Mark each piece as you go so that you don’t forget which one is which.
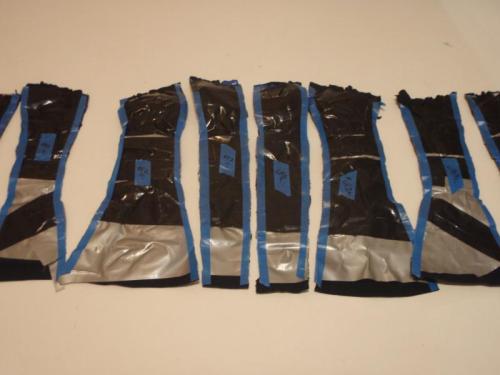
The gaffer-tape cut into pattern pieces.
- Trace the pattern pieces – you’ll have two of each, in my case centre front, outer front, outer back and centre back. Trace the matching pieces over each other – they won’t be the same shape, but should be fairly close. Once you’ve traced them, “split the difference” to get one shape for each pattern piece.

The gaffer-tape pieces traced out in black, and the "split the difference" marked in blue.
Step 2 – Tweaking The Pattern
- Put on Pride and Prejudice. The BBC version, obviously, because a) it’s the only one that really counts, and b) you’ll need something long. I got through three and a half episodes.

My pattern is nearly finished and Lizzie heads off to Derbyshire...
- Cut out the pieces you traced in step 1. Hold them up to yourself, mutter under your breath, despair. Remember another approach you saw on the Internet. Decide to give that a go, using the existing pieces as a starting point. Find the links in Evernote and feel momentarily smug.
- Take some measurements – bust, underbust, waist, hip, and the distances between them all at the front and the side.
- Get a large piece of paper – draw a vertical line for the centre front. Measure out perpendicular lines for bust, underbust, waist and hip.
- Figure out where the waistline is on your existing pieces, and lay them out, lining up their waist markings with the waist line on the paper. Trace around them.
- Measure to make sure that the pattern pieces add up to approximately your waist measurement minus something. This is the time for some more despair, until you figure out which wrong lines you’re measuring between. Coloured pencils may help. If things look about right, move on. Otherwise, repeat as necessary.
- Now you need to “true” the seams – that is, make sure that the length of each seam line matches the corresponding seam on the other pattern piece. They should be pretty close, unless, like me, you forgot to mark out the top and bottom edges of your corset before and need to do it now. Here comes more measuring, more holding up pattern pieces against yourself, and – of course – more despair. If you’ve already ordered your busk (the front fastening thingy), you need to figure out an outline that fits it. Draw small sketches, look up google images. Sketch the lines you think you want, then measuring along the edge of the pattern piece from the waistline out, match up the top and bottom lines.

The paper pattern, complete.
- Once they all match, sit back and admire your work for a moment before organising for a friend to sanity check your pattern. Plan a trip to the public library to photocopy your handiwork so that you don’t have to start from scratch if disaster befalls your first copy. My pattern pieces will fit nicely on two A3 pages, and 60c is a small price to pay for not having to do this again from the start.
Up next: Making a mockup to check the pattern and practice the construction process.
Time For Sewing
Posted in Burning Man, Sewing/Craft on June 1, 2011| 4 Comments »
We’ve now got all the important but boring bits out of the way in our Burning Man planning, and we’re starting to get into the sewing part. Because I don’t have any money to spare for costuming, I’m planning to sew as much as I can from my stash. This has a couple of bonuses – a) it will deplete my stash, and b) by limiting my options, I am less distracted by what could be. Some of the others are struggling to decide what they want to wear at BM, because they have so many options, so much possibility. My extremely limited budget is perversely freeing. I’m trying to keep that in mind as a benefit, especially when I have to cut things from my wishlist, or eat leftovers at planning meetings while everyone else eats pizza. 😛
So what am I planning to make? Here’s a bit of a list:
- A night-time jacket (deserts get pretty darn cold at night) – out of my old car’s sheepskin car seat covers.
- A kimono – from cloth napkins I got from REmida. I’m planning to dye the napkins with shibori techniques, then sew them together into a kimono.
- Turning an op-shop skirt that’s too big into a dress, by adding shoulder straps and some darts.
- Thai fishermen’s pants from some silver satin from the stash. The satin is graduated, so the pants are light at the top graduating to dark grey at the bottom. I might make a couple more pairs depending what I find in my stash.
- Some light tops made of voile, in various loose, floaty, wrappy styles – I’ll make these up as I go, but I’m aiming for simple but unusual construction – inspired by the awesome Pattern Magic books (now available in English!) that I spotted at the craft fair. I’ll probably also be dying these – I’m a little obsessed with shibori.
- A couple of miscellaneous skirts from the stash. Like the voile tops, there’re no detailed plans for these – it’ll depend what I’ve got and how big it is.
- A corset, made from some stripy upholstery fabric from REmida. This is a fairly ambitious one – lots of seams, lined, with boning and busk and lacing.
- And, of course, the electroluminescent wire night-time personal lighting garment, so I don’t get run over by an art car in the dark. I’m going to make a jelly-fishy skirt with hanging bits of EL wire and other fabric bits, with a wide waistband to hold the wiring, inverter and eight-AA powerpack(!).
- A crazy crocheted sun hat, inspired by Crocheting Adventures with Hyperbolic Planes.
So, yeah, I’m going to be kept busy for the next few months. I’m planning to document it all here. Step 1 is to work out a rough schedule and a budget. There are quite a few new things in there – the dying, EL wire, and practically all of the corset stuff, but most of the rest is very straightforward, so it balances out a bit. I’m pretty excited about the shibori. Should certainly come out of this with more sewing knowledge than I had going in!
The Importance of Place
Posted in Anthropology, Burning Man on May 17, 2011| Leave a Comment »
This year’s Burning Man theme is “Rites of Passage”. Burning Man is always so full of rites of passage that this theme seems both perfect and redundant. I’ll probably go on at length about Burning Man’s rites of passage at some point, but today I’m looking at one specific ritual, and a different interpretation of it that comes from my anthropological perspective (I suspect that throughout my Burning Man journey I’ll find things that I see differently from my “lay” co-travellers).
Burning Man is held on the Black Rock Desert – a old dry lake bed, called the ‘playa’ (why? I don’t know). The weather is windy and temperamental, and the temperature oscillates between nearly 0 and above 40 degrees Celcius. The playa surface is dust, made of the fine silt of the old lake. It’s very very fine, and a bit alkaline, and gets everywhere. The dust is a major feature of the Burning Man experience.
Last week I was talking to some people who hadn’t really heard about Burning Man and what it was, and they asked why it was held in such a challenging location. To me, the location is a vital part of the event. Burning Man is about creating a new city from scratch, but it’s not just the physical city that is created. The society of the city is made over new as well: the philosophies of radical self reliance, the gift economy, etc – these are all aspects of the new and different social order which is the essence of Black Rock City.
There’s a thing called communitas, that often happens at ritual events, where the usual rules of society are turned upside down or disappear. When the usual structures that categorise and separate people are not there, they are free to interact as whole human beings, and form new (usually temporary) relationships based on personal rather than structural attributes. Burning Man is all about communitas.
I see the desert is a symbol of burning Man’s blank social canvas. Through its emptiness it signals to Burning Man participants that this is a place wholly outside the strictures of normal life, the ‘default’ world. From nothing, participants are free to build from scratch both physically and socially. The immense emptiness of the playa is an important part of what makes Burning Man what it is.
Apparently, if it’s your first time at Burning Man, one of the things the Greeters do when you arrive is get you to roll around in the dust – because you have to learn to “love the dust”. From what my friends have told me, they interpret the “love the dust” ritual as forcing you to accept that the dust will cover you, and will get everywhere – that there’s no point trying to keep it off you.
I also see this ritual, and the admonition to love the dust, as encouraging participants to embrace the playa and its dust as a vital part of the event – as a participant in the shared act of creation and rebuilding that is Burning Man. Rolling in the playa dust connects you to the playa – your new home (the traditional Greeter greeting – to new and old burners alike – is “Welcome Home”). It also connects you to the Burning Man community, through the shared dustiness of the other 50 000 burners. It is a rite of incorporation, re-creating you as a member of the community and a resident of the playa that holds that community.
Anthropology of Burning Man
Posted in Anthropology, Burning Man on May 10, 2011| Leave a Comment »
This morning I had coffee with my honours supervisor. As he did at practically every meeting we had during my honours, he was encouraging me to write. I’ve been feeling the need to write for the last few months – now that my brain has recovered from thesis writing – but I’ve been struggling to figure out what to write about.
During our coffee conversation today I was talking about Burning Man – as I tend to do in many conversations these days. I was talking about how full it is of anthropologically interesting things – rites of passage, rituals, communitas – the whole event is packed with fascinating stuff.
So I’m planning now to try to write my way through my Burning Man experience, from planning and sewing and making bookings, though the event itself, to decompression and reflection after it. I’m going to get some notebooks and make fieldnotes. I’m also hoping to acquire some books and articles and do a bit of theoretical reading – like van Gennep’s The Rites of Passage, some Victor Turner, hopefully some other things I haven’t seen before.
And maybe, hopefully, I’ll find at the end that I have some interesting stuff to turn into an article. Either way it should be fun for everyone to follow along, and maybe pick up some anthropology along the way.


